
Pop up Box Construction Tutorial


Beautiful Gift Box and Matching Card.


Hello to all. I would like to share step by step details on how to construct a pop up box. You will need 2 sheets of A4 card for your box base and inside panel, some card for mats and papers and elements

Step 1
Using your first sheet of A4 cardstock and a scoring board, score the longer length of card at 7cm, 14cm, 21cm and 28cm. Turn your card and leaving the first panel unscored, score across remaining panel at 9cm, as show in picture 1.

Step 2
Fold your box on all of the score lines created. Cut down the shorter 9cm fold lines to make the folds for the top of your box. Trim the excess to create the tab for the side of your box base as shown in picture 2.

Step 3
Create the inner panels of the box. Score and cut a strip of card at 12cm from across the width of your second A4 sheet, this is the depth of the bottom portion of you box. Score across this strip at 2cm, 9cm, 11cm, 18cm, 20cm, Cut off small amount of excess from the end of the card strip. See picture 3.

Step 4
Fold and score your panel to form the two inner panels for the box base as shown in picture 4.

Step 5
Cut the mats for your designer paper layers.
20cm x 6.5cm – 1 required
11.5cm x 6.5cm - 5 required
8.5cm x 6.5cm – 3 required

Step 6
Cut your designer paper layers and glue onto mats.
19.5cm x 6cm – 1 required
11cm x 6cm – 5 required
8cm x 6cm – 3 required

Step 7
Add your mats/layers to the outside of your box construction and 2 inside panels. Add double sided tap to tabs.

Step 8
Fold and assemble your inner box layers as shown in picture 8.

Step 9
Assemble your box round the inner layer construction and tape the side tag on the side of your box base to the inside of the box back panel.

Step 10
Glue the mat and layer onto the back of your box to cover the tag connecting the base of the box to
the back panel. Your basic box construction is complete.

Step 11
Print out the elements and sentiments your require to decorate your pop up box. For this project the elements were printed onto a 300gsm stamping card. Fussy cut your elements, place onto mats if required.

Step 12
Add any further die cut elements you require and stick the elements onto the die cuts to decorate your box.

Care should be taken to ensure your elements do not overhang the edge of the box construction excessively when the box is folded flat, so that it will fit in easily in a C5 envelope for postage.
List of materials used to make this project
Papers and elements from Men Only Collection - Michele R Designs
Crafter's Companion Kraft Card for box base
Crafter's Companion Black Matt card for mats
Sating Finish printer paper and Sheena Stamping card for layers and detail
Tim Holtz die - Gadget Gears
Embossing folder and distress ink detail
The Big Score Board
© dreamlaine.blogspot.co.uk 2011-2015. Unauthorized use and/or duplication of this material without express and written permission from this site’s owner/author is strictly prohibited.
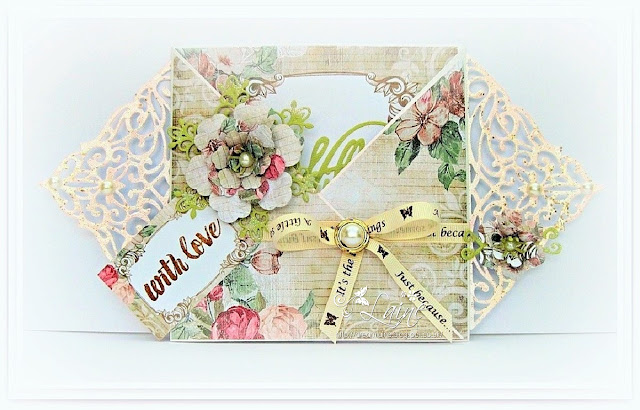
Cross over card and insert tutorial.


© dreamlaine.blogspot.co.uk 2011-2015. Unauthorized use and/or duplication of this material without express and written permission from this site’s owner/author is strictly prohibited.
Cross over card and insert tutorial.

- For this project 2 A4 sheets of the card of your choice are scored in half, folded and cut at 6'', to make two 6'' x 6'' approx. card fronts/backs. Cut one front panel of each card on the diagonal to form the cross over section of your card. Place one of the cards behind the other and glue together. This card can also be made from a sheet of A3 card which has been scored, cut and folded to make 3 identical panels, with the two outer panels being cut on the diagonal.

- Make a card insert panel to slide into the cross over card pocket. This will be slightly smaller to fit easily into the pocket. For this project an insert card was created.

- Make die cut decoration, if required. Here panels were made for the card insert and the back of the cross over pocket.

- Print out the digital papers and the elements you require and add to the card front and inside. You can also decorate the card insert.

- Here the cross over section has been left loose and secured with a ribbon. You may choose to glue the overlapping panel together. Add you ribbon. For this project the ends of the ribbon were secured behind the back panel.

6. Add any decoration you require to your decorative panels. Stampendous Frantage has been used to make the panels sparkle Add the back panels to you card, over the end of your ribbon, a decorative panel has been used to decorate the back of the card.
7. Colour your image to match the papers and elements you have picked for your design.
Materials used to make this card:
Basic Vintage Papers and Elements Michele R Designs.
Image - Leilani - Conie Fong
Spectrum Noir markers and pencils used:
Image - Leilani - Conie Fong
Spectrum Noir markers and pencils used:
Skin: FS2, FS4, FS6, FS3, TN3, + 01, 05, 09, 28, 87
Hair: EB2, EB4, + 92, 102, 120
Clothes and flowers: LG1, LG2, LG3, CT2, PP1, PP2, PP3, + 14, 25, 45, 47,
Centura Pearl Card
Stampendous Frantage
Die cuts of your choice
Satin Finish Printer Paper
Stamp, ribbon and bling from my stash.
Centura Pearl Card
Stampendous Frantage
Die cuts of your choice
Satin Finish Printer Paper
Stamp, ribbon and bling from my stash.
© dreamlaine.blogspot.co.uk 2011-2015. Unauthorized use and/or duplication of this material without express and written permission from this site’s owner/author is strictly prohibited.
Beautiful Gift Box and Matching Card.
I have modified a milk carton template to make this project. Use either a scoring board or print out a free milk carton template from the internet, to make a three sided box.

You will need two of these shapes to make your box. The templates are shown in white card so that you can clearly see the score, fold lines. The box and card projects have been made in kraft card for strength and durability.

Score the template as shown, create top folds from the upper crease to the top of box. You will have three sections, a top, middle and base.

Crease you folds as shown. On the top section of the box these will fold in, to create the top of the box and out were your ribbon/twine will be threaded to pull your box top into shape. Punch out small holes along your outward folds as shown, for threading your ribbon/twine. Cut upward along the base lines to form the base of your project.

Glue both of your three sided shapes together using the scored side tabs. Refold the middle section and score with a bone folder to sharpen your box shape. Fold under the cut base sections and glue in an overlapping sequence. I cut a circle shape to fit the bottom of the box and used this over the folds to create a neat base and for added strength.Decorate your box as desired. Thread your ribbon through the punched holes in the box top to create your shaped lid. Add flowers and other decoration as you require.

A sweet gift card has been made using matching papers and elements.
List of materials used to make this gift set:
Crafter's Companion Kraft Card
Crafter's Companion Satin Finish Printer paper
Flowers, ribbon, pearls are all from my stash.
© dreamlaine.blogspot.co.uk 2011-2015. Unauthorized use and/or duplication of this material without express and written permission from this site’s owner/author is strictly prohibited.


