Members

Sunday, 25 September 2011

Birds in the Sewing Room

Happy Sunday to everyone.  We are enjoying Autumn sunshine here and hope that all is fine with you.

My card today uses the lovely topper sheet from Hunkydory called Birds in the Sewing Room.  I am entering this card into  the Kaboodle Doodles Challenge #85 - Lots of Layers.

I am really interested in different types and styles of cards at present and used the tutorial I found at Anne's paper fun to make this envelope card.  It has lots of layers but is presented in a different and lovely way.


The base of the card is created from one sheet of 12' x 12' paper which is folder as per the instructions on the tutorial above.  Two pockets are created to hold decorated toppers.  The front of the card has been decorated with a mounted foiled topper, a Martha Stewart die cut layer, a layer of lace and lovely vintage seam binding ribbon and flowers from my stash and a foiled gold die cut.  The label reads Happy Birthday and is decorated with a key so this card could be used for a special birthday.  I have cut a key from shrink plastic and decorated with copper embossing powder and this embellishment has also been added to the card.


Showing the other side of the envelope card with layers and decoration.


A closer view of decoration, flowers, lace, ribbon and die cuts on the front of the card.


A decorated label from the inside of the card used foiled mounted image and ribbon and die cut.  Also showing greeting label and mini shrink plastic key.  This has been created using a Tim Holz Altered Image Die.


The other side of the label
.


Picture above shows the label from the second pocket, another fabulous Hunkydory foiled image with decoration.


 I have found a lot of tutorials recently on various shapes, varieties of cards so please keep looking and leave your comments to let me know what you think.

Sending warmest wishes to all.


X


Tuesday, 20 September 2011

Little Elf Mim

Please say hello to 'Little Elf Mim' from Mo Manning, this image is delicious and I had fun colouring and glittering the image.

I will be entering this card in the exciting  Challenge #100 - Let's Celebrate at  Mo's Challenge Blog.


This has been another fun project.  I have made an easel base for the card and have decorated the inside to match the front, with a few variations.  The papers are from my stash and the shades work well together.  The image has been coloured using Promarker pens and glittered and decorated with Flower Soft polar white for the fur trim.  I have used Tim Holtz distress ink to make the cloud background for the image.  The ribbon and flowers are from my stash as are the various paper embellishments and greetings panels. 


The front of the card showing lovely image and details of embellished star/snowflake decorations.   These have been produced from paper which I have embossed and also some are shrink plastic covered in embossed ink.  I saw this idea on a video tutorial made by Bev Rochester

 I hope you like this card, thank you for reading this post and please call again soon.

Sending warm wishes to all,


       X


Sunday, 18 September 2011

A Fairy for Autumn

This is a beautiful image which can be found on sheet 3 at  Whoopsi Daisy Designs
 and I have coloured the image using lovely rich Autumn shades and mounted on a distressed ink sky background.   I have entered this easel card in the following Challenges.


This is a most beautiful image and lovely to work with.  The layers and detail suggested Autumn to me and I think she is just fabulous.  I have used mostly Promarker pens in shades of yellow, orange and brown and jelly roll gold pen.  These are not shades I often use but I think they have worked well.  The image is mounted onto a matching die cut of mirror card and again matching Autumn shades of mulberry flowers and backing paper have been used.  The Papers are from Kaisercraft and Graphic 45 and the ribbons I have had in my stash for a while.  I have used twine on the card which is quite rustic and a couple of corner embellishments from Wild Orchid Crafts.   I had a sheet of Autumn toppers in my stash and think they work very well with this card.


Image showing closer detail of the front of the card to include Grateful topper and Chrysanthemum topper which has a space for recording a greeting.    I love the colours on this card and how they have worked as its really out of my comfort zone.


The bottom of the easel card showing the lovely verse - 'Dancing, twirling, fluttering by Autumn in all her golden splendor casts her beauty upon us'  There is a further Autumn topper and matching papers, filigree corner, ribbon and a cute little mulberry flower.

 
  I have really, really enjoyed making this card and could have added loads more detail but for once have restrained myself.  Thank you for reading this post, I love to look at other crafter's blogs, it gives such joy and inspiration and I find this so peaceful.   I  hope you like this card, please visit again soon.  Please feel free to leave your thoughts and comments.

Sending warmest wishes to all,


X


Saturday, 17 September 2011

Steampunk Annie

I love this image from Simply Betty Stamps.  It is beautiful and fun to colour.  I am entering this card for Challenge # 84 - Chipboard  at Kaboodle Doddles Challenge Blog


The image is coloured using Pro markers and the background using distress inks.  I have dry embossed and cut a frame for the image and used gold embossing powder to bring out the detail of the image.  The backing papers for the card are from the Steam punk Debutante Collection by Graphic 45 and are really lovely rich colours and quality papers.  I have mounted a Chipboard Love circle on the inside of the card which is a gate fold design.


I have used matching papers for the front of the card and I love these shades.  There is a gold ribbon and bow and fabulous flowers with lace in an antique peach shade.  There are also several die cut mirror card butterflies on the front of the card.

Thank you for reading this post.  I hope you like the card, please call again soon as I should  be listing more over the next few days.  I  have so many images coloured and waiting to be mounted, I am sure you will have to.

Sending warmest wishes to all,


Tuesday, 13 September 2011

Feeling Hunkydory

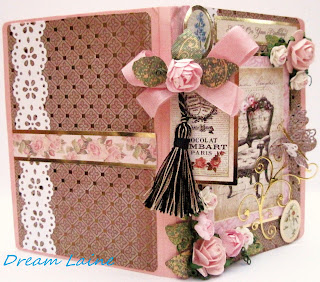
I love to stamp and colour but I also enjoy making cards from kits and Cd's and this is card is an example of a Box Card created with a fabulous foiled kit from Hunkydory with some extra embellishments.  Unfortunately for me the term less is more does just not make sense.


The base of the card and the inside pages have been made from a sheet of A3 card and the size of the card is approx.  4.5" x 6" and I have made a little spine to take the depth of the contents.  The backing paper is foiled and from my stash and I have used two 12" x 12" sheets to make the mounting panels and decoration.  I have added lovely flowers from my stash and have made leaves and embellishments with various dies .  I have used gold mirror card and the swirls look fab.  There is a little greeting tag on the front of the card with tassel and ribbon and flower decoration.


Showing the front and back of the card with matching matting and embellishment. 


Some of the inside panels of the card which fold out for display.


Thank you for reading this post.  Please leave a comment as these are always appreciated and visit again soon.

Sending kindest wishes to all,


               X


Tuesday, 6 September 2011

Christmas Bunny

This stamp features the delicious Christmas Bunny Digital Stamp from Wee Stamps.  This fun image has been mounted as a shaker style card,  I am quite obsessed with this style of card at present as they are so much fun to make.

I will be entering  this card for the following Challenges:


This card is very jolly and crisp and bright.  The beautiful image has been coloured using Prismacolour pencil and using blending and also Promarker and Gel pens.  I have used Flowersoft to create the bunny tail and hat fur and Diamond Dust glitter for the snow.  The background has been created with vintage distress inks.   The card is mounted into a small box frame and a circular frame was cut and backed with acetate and filled with colourful sequins.  The papers are from my stash as is the adhesive ribbon.  The ribbon is new and I have used a die cut holly decoration.  The flowers are from Wild Orchid Crafts and I have all used a mitten embellishment from my stash.  The lovely tea bag trees have been created following a tutorial provided by Lili of the Valley


The inside of the card featuring another smaller coloured, glittered image and another Tea Bag Tree.  There is also a shaped panel for recording a greeting.

This is my card for today and I hope you like it.  Thank you for reading this post and for looking at my card.

Sending warmest wishes to all.

X


Saturday, 3 September 2011

Little Sugar Plum Fairy

This is the utterly adorable Little Sugar Plum Fairy by Mo Manning and I am entering this card for  Mo's DP2 Challenge #98  and  Challenge #82 - Easel does it at Kaboodle Doodles Challenge Blog.


I have coloured the image using Prismacolour pencils and Promarker pens and have glittered highlights on the image which is mounted onto a doily created from a Cheery Lynn Designs cutting die. 


A closer view of the front of the card showing detail and embellishments.  I have used various beautiful roses and flowers to decorate the card from Wild Orchid Crafts and other suppliers.   The leaves are made with Spellbinder cutting dies and I have used a lovely crown pin.  The ribbon is matching shade vintage seam binding with flower and leaves.  The backing papers are from my stash.  I have die cut some snowflakes and embossed these with ultra thick embossing powder and glitter.   There is a button and embroidery silk embellishment and a lovely little Tibetan silver filigree tree decoration.  The silver greeting is from Craftwork Cards and reads Christmas Wishes.

Thank you for looking at my card.  I hope you liked it.  Please stop by again soon and leave a comment to let me know what you think.

Kind regards to all.


                                                                                 X


Wedding Memory Book.

Hello to all.    Following my daughter Suzanne's recent wedding to Harry and all of the beautiful pictures of the event.   I have ...